Table of Contents
The executable doxygen is the main program that parses the sources and generates the documentation. See section Doxygen usage for more detailed usage information.
Optionally, the executable doxywizard can be used, which is a graphical front-end for editing the configuration file that is used by doxygen and for running doxygen in a graphical environment. For Mac OS X doxywizard will be started by clicking on the doxygen application icon.
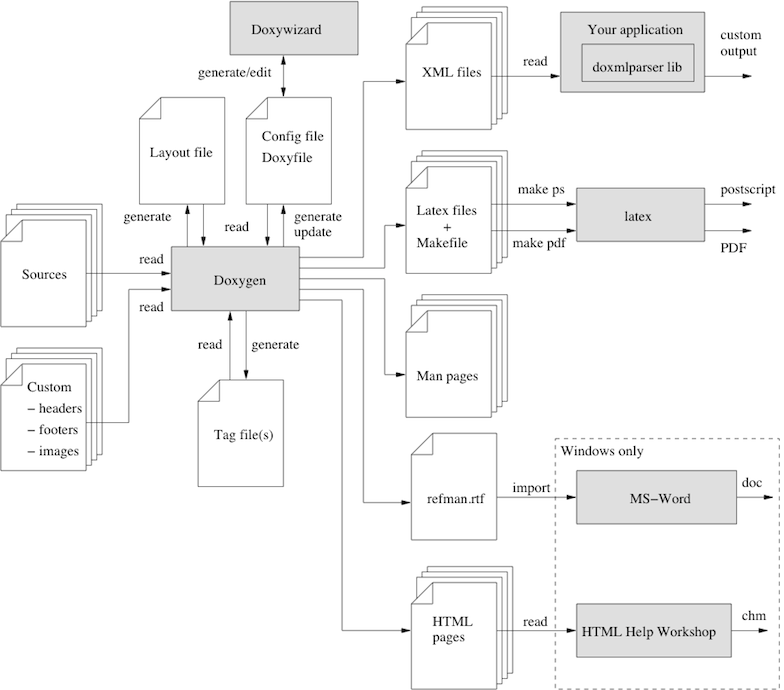
The following figure shows the relation between the tools and the flow of information between them (it looks complex but that's only because it tries to be complete):
Step 0: Check if doxygen supports your programming language
First, assure that your programming language has a reasonable chance of being recognized by doxygen. These languages are supported by default: C, C++, C#, Objective-C, IDL, Java, VHDL, PHP, Python, Fortran and D. It is possible to configure certain file type extensions to use certain parsers: see the Configuration/ExtensionMappings for details. Also, completely different languages can be supported by using preprocessor programs: see the Helpers page for details.
Step 1: Creating a configuration file
Doxygen uses a configuration file to determine all of its settings. Each project should get its own configuration file. A project can consist of a single source file, but can also be an entire source tree that is recursively scanned.
To simplify the creation of a configuration file, doxygen can create a template configuration file for you. To do this call doxygen from the command line with the -g option:
doxygen -g <config-file>
where <config-file> is the name of the configuration file. If you omit the file name, a file named Doxyfile will be created. If a file with the name <config-file> already exists, doxygen will rename it to <config-file>.bak before generating the configuration template. If you use - (i.e. the minus sign) as the file name then doxygen will try to read the configuration file from standard input (stdin), which can be useful for scripting.
The configuration file has a format that is similar to that of a (simple) Makefile. It consists of a number of assignments (tags) of the form:
TAGNAME = VALUE or
TAGNAME = VALUE1 VALUE2 ...
You can probably leave the values of most tags in a generated template configuration file to their default value. See section Configuration for more details about the configuration file.
If you do not wish to edit the configuration file with a text editor, you should have a look at doxywizard, which is a GUI front-end that can create, read and write doxygen configuration files, and allows setting configuration options by entering them via dialogs.
For a small project consisting of a few C and/or C++ source and header files, you can leave INPUT tag empty and doxygen will search for sources in the current directory.
If you have a larger project consisting of a source directory or tree you should assign the root directory or directories to the INPUT tag, and add one or more file patterns to the FILE_PATTERNS tag (for instance *.cpp *.h). Only files that match one of the patterns will be parsed (if the patterns are omitted a list of typical patterns is used for the types of files doxygen supports). For recursive parsing of a source tree you must set the RECURSIVE tag to YES. To further fine-tune the list of files that is parsed the EXCLUDE and EXCLUDE_PATTERNS tags can be used. To omit all test directories from a source tree for instance, one could use:
EXCLUDE_PATTERNS = */test/*
Doxygen looks at the file's extension to determine how to parse a file, using the following table:
| Extension | Language | Extension | Language | Extension | Language |
|---|---|---|---|---|---|
| .dox | C / C++ | .idl | IDL | .f | Fortran |
| .doc | C / C++ | .ddl | IDL | .for | Fortran |
| .c | C / C++ | .odl | IDL | .f90 | Fortran |
| .cc | C / C++ | .java | Java | .f95 | Fortran |
| .cxx | C / C++ | .cs | C# | .f03 | Fortran |
| .cpp | C / C++ | .d | D | .f08 | Fortran |
| .c++ | C / C++ | .php | PHP | .f18 | Fortran |
| .ii | C / C++ | .php4 | PHP | .vhd | VHDL |
| .ixx | C / C++ | .php5 | PHP | .vhdl | VHDL |
| .ipp | C / C++ | .inc | PHP | .ucf | VHDL |
| .i++ | C / C++ | .phtml | PHP | .qsf | VHDL |
| .inl | C / C++ | .m | Objective-C | ||
| .h | C / C++ | .M | Objective-C | .md | Markdown |
| .H | C / C++ | .py | Python | .markdown | Markdown |
| .hh | C / C++ | .pyw | Python | .ice | Slice |
| .HH | C / C++ | ||||
| .hxx | C / C++ | ||||
| .hpp | C / C++ | ||||
| .h++ | C / C++ | ||||
| .mm | C / C++ | ||||
| .txt | C / C++ |
Please note that the above list might contain more items than that by default set in the FILE_PATTERNS.
Any extension that is not parsed can be set by adding it to FILE_PATTERNS and when the appropriate EXTENSION_MAPPING is set.
If you start using doxygen for an existing project (thus without any documentation that doxygen is aware of), you can still get an idea of what the structure is and how the documented result would look like. To do so, you must set the EXTRACT_ALL tag in the configuration file to YES. Then, doxygen will pretend everything in your sources is documented. Please note that as a consequence warnings about undocumented members will not be generated as long as EXTRACT_ALL is set to YES.
To analyze an existing piece of software it is useful to cross-reference a (documented) entity with its definition in the source files. Doxygen will generate such cross-references if you set the SOURCE_BROWSER tag to YES. It can also include the sources directly into the documentation by setting INLINE_SOURCES to YES (this can be handy for code reviews for instance).
Step 2: Running doxygen
To generate the documentation you can now enter:
doxygen <config-file>
Depending on your settings doxygen will create html, rtf, latex, xml, man, and/or docbook directories inside the output directory. As the names suggest these directories contain the generated documentation in HTML, RTF,  , XML, Unix-Man page, and DocBook format.
The default output directory is the directory in which doxygen is started. The root directory to which the output is written can be changed using the OUTPUT_DIRECTORY. The format specific directory within the output directory can be selected using the HTML_OUTPUT, RTF_OUTPUT, LATEX_OUTPUT, XML_OUTPUT, MAN_OUTPUT, and DOCBOOK_OUTPUT. tags of the configuration file. If the output directory does not exist, doxygen will try to create it for you (but it will not try to create a whole path recursively, like mkdir -p does).
HTML output
The generated HTML documentation can be viewed by pointing a HTML browser to the index.html file in the html directory. For the best results a browser that supports cascading style sheets (CSS) should be used (I'm using Mozilla Firefox, Google Chrome, Safari, and sometimes IE8, IE9, and Opera to test the generated output).
Some of the features the HTML section (such as GENERATE_TREEVIEW or the search engine) require a browser that supports Dynamic HTML and JavaScript enabled.
LaTeX output
The generated documentation must first be compiled by a compiler (I use a recent teTeX distribution for Linux and MacOSX and MikTex for Windows). To simplify the process of compiling the generated documentation, doxygen writes a Makefile into the latex directory (on the Windows platform also a make.bat batch file is generated).
The contents and targets in the Makefile depend on the setting of USE_PDFLATEX. If it is disabled (set to NO), then typing make in the latex directory a dvi file called refman.dvi will be generated. This file can then be viewed using xdvi or converted into a PostScript file refman.ps by typing make ps (this requires dvips).
To put 2 pages on one physical page use make ps_2on1 instead. The resulting PostScript file can be send to a PostScript printer. If you do not have a PostScript printer, you can try to use ghostscript to convert PostScript into something your printer understands.
Conversion to PDF is also possible if you have installed the ghostscript interpreter; just type make pdf (or make pdf_2on1).
To get the best results for PDF output you should set the PDF_HYPERLINKS and USE_PDFLATEX tags to YES. In this case the Makefile will only contain a target to build refman.pdf directly.
RTF output
Doxygen combines the RTF output to a single file called refman.rtf. This file is optimized for importing into the Microsoft Word. Certain information is encoded using so called fields. To show the actual value you need to select all (Edit - select all) and then toggle fields (right click and select the option from the drop down menu).
XML output
The XML output consists of a structured "dump" of the information gathered by doxygen. Each compound (class/namespace/file/...) has its own XML file and there is also an index file called index.xml.
A file called combine.xslt XSLT script is also generated and can be used to combine all XML files into a single file.
Doxygen also generates two XML schema files index.xsd (for the index file) and compound.xsd (for the compound files). This schema file describes the possible elements, their attributes and how they are structured, i.e. it the describes the grammar of the XML files and can be used for validation or to steer XSLT scripts.
In the addon/doxmlparser directory you can find a parser library for reading the XML output produced by doxygen in an incremental way (see addon/doxmlparser/include/doxmlintf.h for the interface of the library)
Man page output
The generated man pages can be viewed using the man program. You do need to make sure the man directory is in the man path (see the MANPATH environment variable). Note that there are some limitations to the capabilities of the man page format, so some information (like class diagrams, cross references and formulas) will be lost.
DocBook output
Doxygen can also generate output in the DocBook format. How to process the DocBook output is beyond the scope of this manual.
Step 3: Documenting the sources
Although documenting the sources is presented as step 3, in a new project this should of course be step 1. Here I assume you already have some code and you want doxygen to generate a nice document describing the API and maybe the internals and some related design documentation as well.
If the EXTRACT_ALL option is set to NO in the configuration file (the default), then doxygen will only generate documentation for documented entities. So how do you document these? For members, classes and namespaces there are basically two options:
Place a special documentation block in front of the declaration or definition of the member, class or namespace. For file, class and namespace members it is also allowed to place the documentation directly after the member.
See section Special comment blocks to learn more about special documentation blocks.
Place a special documentation block somewhere else (another file or another location) and put a structural command in the documentation block. A structural command links a documentation block to a certain entity that can be documented (e.g. a member, class, namespace or file).
See section Documentation at other places to learn more about structural commands.
The advantage of the first option is that you do not have to repeat the name of the entity.
Files can only be documented using the second option, since there is no way to put a documentation block before a file. Of course, file members (functions, variables, typedefs, defines) do not need an explicit structural command; just putting a special documentation block in front or behind them will work fine.
The text inside a special documentation block is parsed before it is written to the HTML and/or output files.
During parsing the following steps take place:
- Markdown formatting is replaced by corresponding HTML or special commands.
- The special commands inside the documentation are executed. See section Special Commands for an overview of all commands.
- If a line starts with some whitespace followed by one or more asterisks (
*) and then optionally more whitespace, then all whitespace and asterisks are removed. - All resulting blank lines are treated as a paragraph separators. This saves you from placing new-paragraph commands yourself in order to make the generated documentation readable.
- Links are created for words corresponding to documented classes (unless the word is preceded by a %; then the word will not be linked and the % sign is removed).
- Links to members are created when certain patterns are found in the text. See section Automatic link generation for more information on how the automatic link generation works.
- HTML tags that are in the documentation are interpreted and converted to equivalents for the output. See section HTML Commands for an overview of all supported HTML tags.